Designs Used
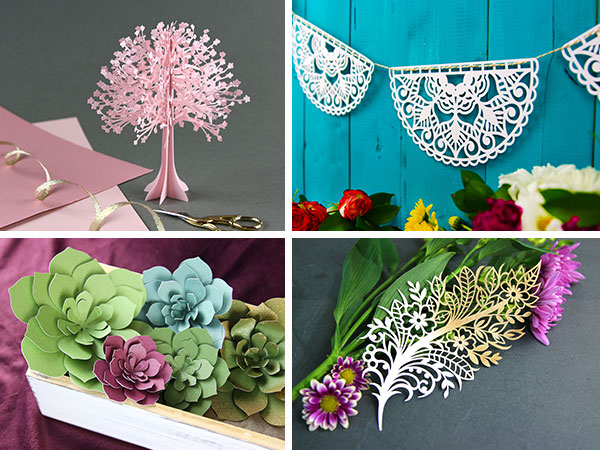
Paper is a versatile material that can be used to make beautiful projects with your digital cutting machine. With different paper types and weights, you can create lovely cards, 3D flowers, home decor, and more. Whether you are an experienced crafter looking for complex motifs, or if you are simply learning and exploring, our in-house artists at Craft Genesis have created a variety of original designs made specifically to cut beautifully out of paper.
When browsing our site, you will notice that may of our designs have photos demonstrating the process, materials, and pieces used to create the finished papercutting products. We also provide the recommended weight of paper, and if elements other than paper are used (such as foam spacers, vellum, etc.).
Explore more papercutting designs on our site.
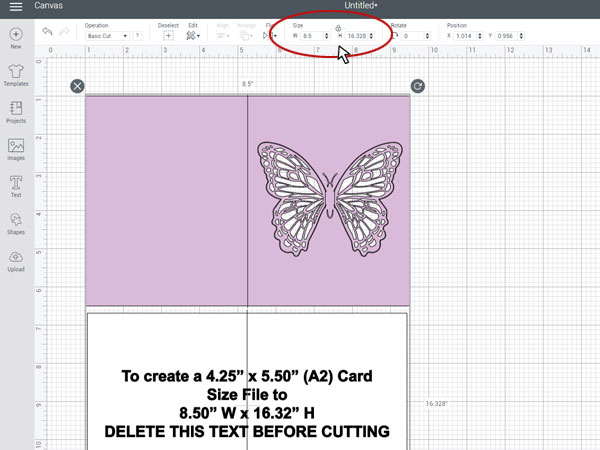
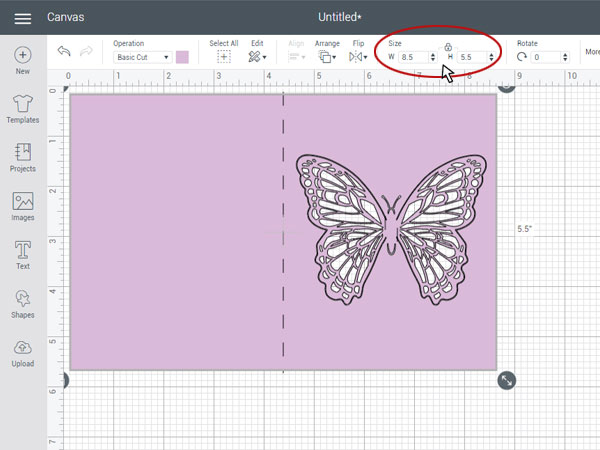
After you have chosen your design, open it in your cutting program to determine how big the pieces are and how many colors of paper you will need. It is at this stage you will want to make sure the design is sized correctly.
Some designs (such as greeting cards, envelopes, gift card holders, and more) are formatted to be specific dimensions. For designs in our collection that require specific measurements, we have included this information in both the file, and in the online item description. Simply select all the design pieces together, and ensure they match the listed size. If a design does not include specific measurements, it can be sized as desired. While some designs (such as our canning jar lid ornaments) were created with a specific function in mind, these too can be sized to meet the needs of another project. So long as the design fits your cutting mat, you should be good to go.
Quick tip: Be careful when making some designs smaller as they can become too delicate and detailed for your cutting machine.

If there is only one piece in your design, and no scoring, drawing, or cutting lines, skip this step and the following two steps. For designs with multiple pieces, continue reading below.
Most designs with multiple pieces will load as “grouped” in the software and can be selected and moved together by clicking on one piece. Before proceeding, ungroup the pieces, following the method required by your specific software program, but do not move the pieces around just yet. Some pieces may need to be grouped together later. After the pieces are ungrouped, verify that they are all set to “cutting.”
Before we start regrouping pieces in the following steps, now is the easiest time to change the color of your paper pieces. Cutting software is generally programmed to be efficient and will try to fit as many pieces as possible onto a single sheet of paper. Therefore, each color represents a different cutting mat or piece of paper. For example, if all your design pieces are white, it will place them together on the same mat (if they fit). However, if all the design pieces are different colors, it will cut them out separately on different mats. Following those rules, change any pieces to the same or different colors depending on how you want them to cut out.
After the design is sized correctly, delete the cutting dimension information if it is in the file, but do not delete any extra lines you may see. These will be discussed in the following steps.
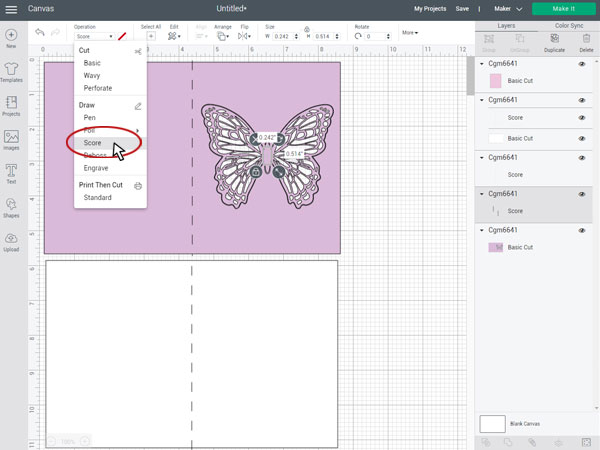
In designs that include cutting, drawing, and scoring lines all in one file (such as in greeting cards, boxes, treat bags, etc.) you will notice that there may be different types of lines used to differentiate between cutting and scoring. For example, in Cricut software, cutting lines are solid, and scoring lines are dashed. It is important to note the function of each line included in the design so that it will cut out correctly. You do not want to cut along scoring lines, as these are included to make folding the design easier and are often created with a scoring tool.
Quick tip: Not all cutting machines have a scoring tool available. If this is the case, follow your manufacturer’s instructions, and be careful when using off-brand tools. If an off-brand tool breaks your machine, some warranties will not cover the damages.
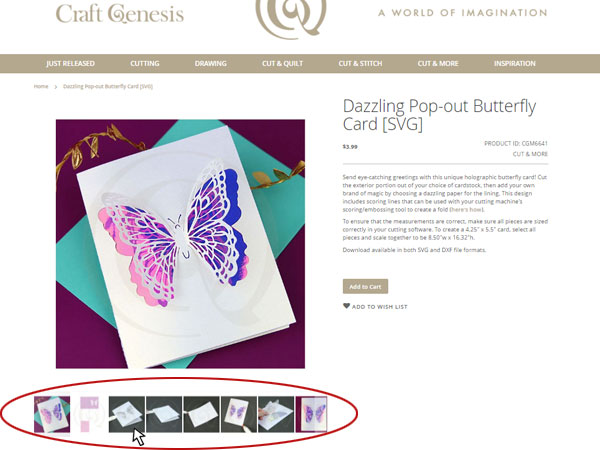
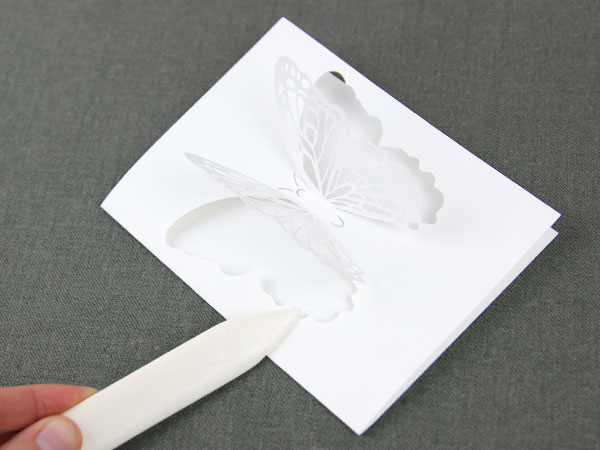
For best results we recommend referencing the photos of the design on our website to determine which setting is correct for each line. In some of our newer designs, our scoring lines show as dotted and our cutting lines as solid, but this is not always the case. For example, in the Happy Birthday Sunburst Card we used scoring lines, in the Butterfly Lollipop Holder two small cutting lines are used to show scoring, and in the Dazzling Popout Butterfly Card both drawing and scoring lines are used.
Once you have discovered if each line should be cutting, scoring, or drawing, change them to the appropriate setting in the software. If your machine cannot score, simply delete the lines in your software. However, do be careful that these lines are not moved if you are simply changing their settings.
Quick tip: If a design contains drawing lines, each color of line will draw out together as one pen or marker color. Change the colors as needed in your software if you would like the drawing lines to be different colors.
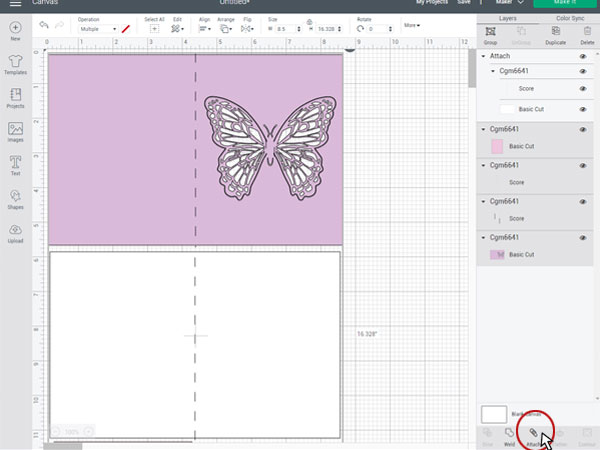
Now that all the lines in the design are changed to the correct setting, we need to “group” them to the correct paper piece. Grouping lines with the proper paper piece ensures that the lines will stay in place and score, cut, or draw exactly where they are meant to. If you do not group the lines with the appropriate paper shape, they will be moved when you go to cut out your design.
To group the correct lines and design pieces, select one paper piece, and all the lines that sit on top of it (not just one line at a time). For example, if the front of our card has three scoring lines, select all 3 lines and the front of the card together. Then click the appropriate button to group them. Repeat this step for any remaining lines and paper pieces.
Quick tip: Be careful not to attach any paper pieces together in this step. Keep in mind, the wording of this action may differ between programs.
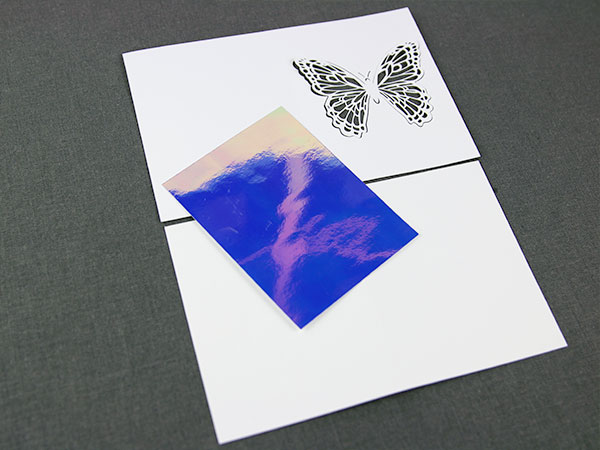
Now that your file is properly set up, we recommend using your software to determine the number of paper colors you will need to complete your design. For example, our design will need three paper colors: one for the outside of the card, one for the inner liner, and one for the accent piece. Like we explained earlier, the color of the pieces in the software is used to determine how they are sorted together while cutting. If you still need to change the colors, and have grouped lines in your file, you may need to ungroup them to change the piece color, depending on your program. If any color changes are made, make sure to re-group them after editing the color.
Once you know how many different colors of paper you will be cutting, you can find the size of paper needed. Doing this can be helpful, allowing you to use scraps and smaller pieces of paper rather than whole sheets every time.
If there is only one piece of your design being cut out of a paper color, simply click on the shape in the software so you have it selected. The software should then display the size of this piece somewhere on the screen. It’s okay to include any attached lines in the size as well. For example, our card front is 8.5” x 5.5”. The paper piece needs to be at least ½” bigger in both height and width than the shape that is being cut out, so add that to both the height and width of the shape. For our card front, we chose a piece of paper that was at least 9” x 6”.
If there are multiple pieces being cut out of the same piece of paper, it makes choosing the paper size a little more complicated. When going to cut, most programs will change how these are laid out together on the mat, moving them to cut in the formation that the computer thinks will waste the least amount of paper. To find the size of paper needed for multiple pieces, you can either guess by selecting them together and looking at the sizes like we did, or you can move to the cutting step in your program and look to see how they pieces are sorted on the mat. If your program and mat have grid lines, this can be very helpful to find the correct sizing after the pieces are sorted to cut.
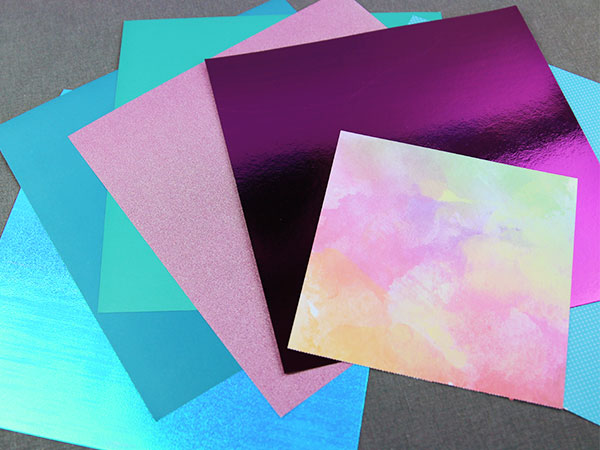
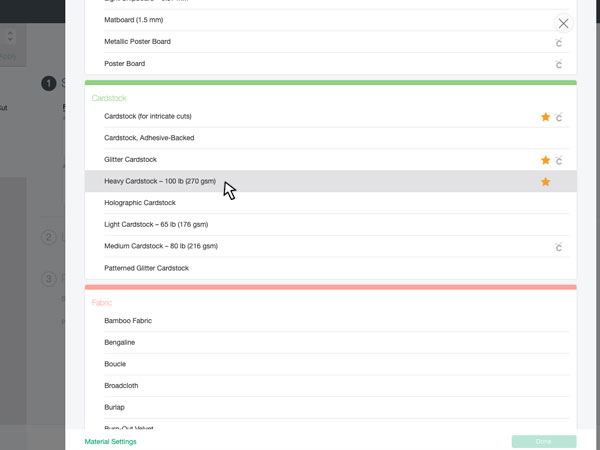
Once you have the sizes and number of paper colors that you need, it is time to select your paper! The most common type of paper used for cutting machine projects is cardstock. Cardstock is widely available online and in craft stores, and it comes in a wonderful variety of weights, colors, finishes, and textures. It typically comes in 12" x 12" sheets (which is the size of most cutting mats) but can be found in other sizes as well. Some popular brands of cardstock are Neenah, Recollections, Colorbox, Clear Path Paper, Cardstock Warehouse, Park Lane, or DCWV. Any of these brands will work well with your cutting machine and are easy to find. You can also use beautiful handmade paper, painted watercolor paper, photo paper, and more. It really comes down to taste, how you want the final project to look, and what will work well with your specific brand of cutting machine.
One of the most important factors in choosing your paper is its weight or thickness (often shown as 65 lb. or 65#, with weights commonly ranging between 65 lb. and 110 lb. or heavier). As the weight of paper increases, it will become more stiff and harder to fold. For this reason, we frequently use 65 lb. cardstock since it is easy to fold and suits the widest variety of projects.
Quick tip: Card liners work best when cut out of lightweight paper (65 lbs. or less), and 3D objects or very intricate designs hold up better when cut out of thicker paper (such as 100 lb. -110 lb.).
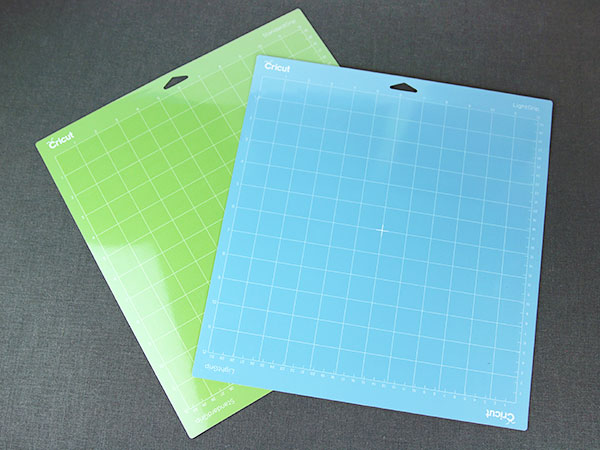
For papercutting, we find that a medium or light grip mat works best. Depending on how detailed the design is, what paper you are using, the cutting blades you have available, and your own personal preference, both mat types come with their own benefits. For example, if the paper tends to shift around while cutting, a stronger grip mat is better at holding the paper in place. If a design is delicate, a lighter grip mat makes design removal easier after the motif has been cut out. Try making different projects, and testing what mats work best for you with various designs and materials.
Quick tip: Mats do wear out over time and lose their adhesive quality. Worn out mats can be used for less detailed designs but stick to newer mats when cutting more complex or stubborn designs.
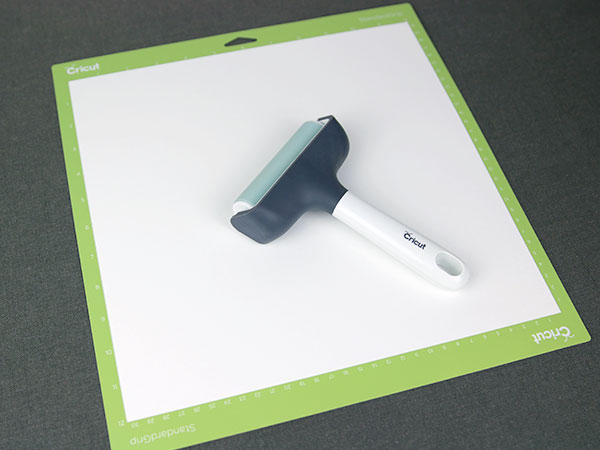
When preparing to cut your paper, how and where you place it on your mat is important. With the right side of your paper facing up, use your hands to smooth the paper onto your mat in the area where the design will be cutting. Take care that no paper is hanging over the sides of your mat, as this can cause shifting and/or hit parts of the machine as your design is being cut. Once placed, use a brayer tool (or a hard and smooth piece of plastic) to remove any bubbles and create a stronger bond between the mat and your paper. Masking tape can also be used around the edges of your paper if the mat is worn out and you need to secure the hold.
Now that both your file and paper are ready to go, it is time to adjust the settings and tools on your cutting machine! The settings that you choose are important and will depend on a few factors:
- The type of paper you choose
- Your weight of the paper
- How intricate or detailed your design is
- The tools and blades available for your specific digital cutting machine
Every brand and kind of machine will cut differently and will have different tools and blades available. Some machine brands allow you to adjust the pressure used when cutting, others (like Silhouette) allow you to manually change the depth of your blade (how much it sticks out of the tool casing). Increasing pressure and blade depth will make it easier to cut through thicker paper, while too much pressure can easily cut through your mat. Therefore, we recommend testing your materials and designs for best results.
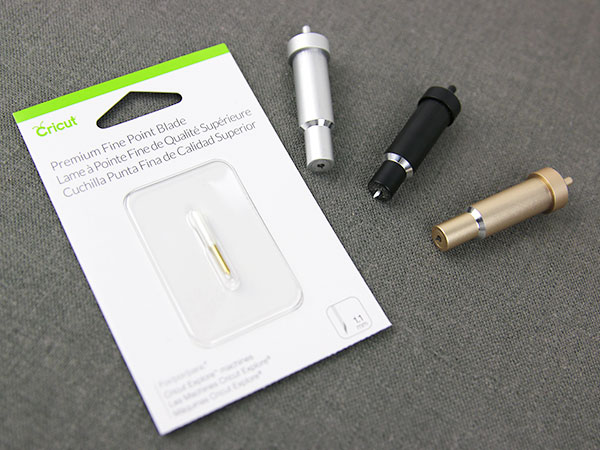
The basic blade that is included with your cutting machine at purchase is the blade most commonly needed. Standard blade, fine point blade, ratchet blade, and premium blade are examples of basic blades that you may find across machine brands. The other cutting tools you can purchase are used less commonly for paper and might not be available for your machine at all (scoring tools are a good example of this).
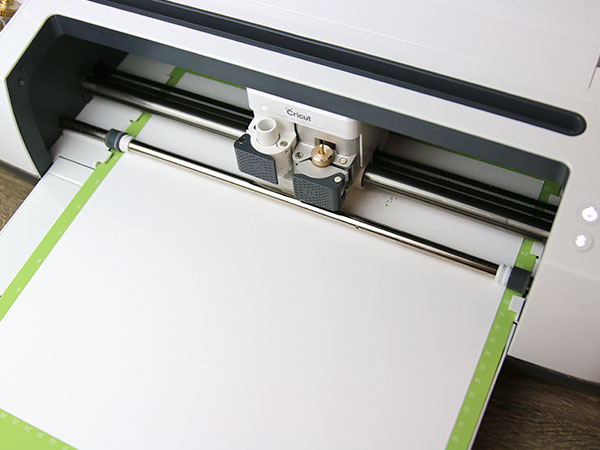
Once you have selected your settings and tools, it is time to cut out your design! Before loading the mat into the machine, check the grips on the roller bar to make sure that they are spaced evenly. These grips are what move the mat in and out of the machine. They also prevent shifting.
If your chosen design includes more than just lines for cutting (such as scoring lines or drawing lines), follow your software’s instructions and complete each step in the order the software has chosen, switching tools as the design progresses.
Quick tip: Some heavier or textured papers may need to be cut more than once to cut all the way through the paper. Before ejecting your mat from the machine, check to see if the design has been successfully cut. Leaving the mat on your machine will ensure that it remains lined up for the second cut.
If problems occur, please reference our trouble shooting guide at the end of this article.
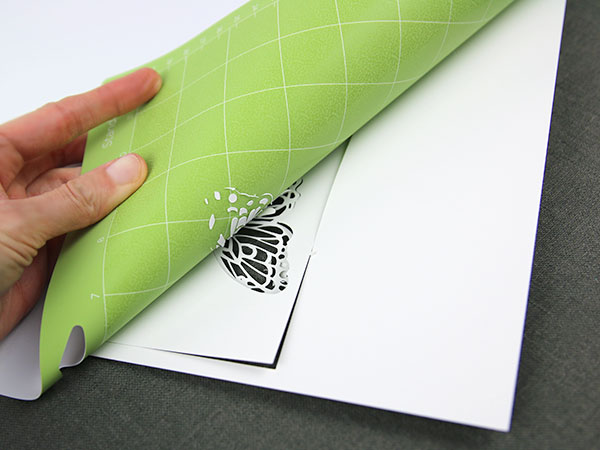
After the design has finished cutting, it is time to remove it from the mat. To prevent the paper from curling, it is best to remove the mat from the paper rather than pulling the paper off the mat.
To do this, flip the mat over so the paper is facing down against the table. Select one corner of the mat and slowly curl it upward away from the table. When you see the paper, gently peel it away from the mat using your fingernails or a small tool (like a spatula). As you pull, press the paper down so it lays flat against the table. Continue this process until you have fully removed the design from the mat.
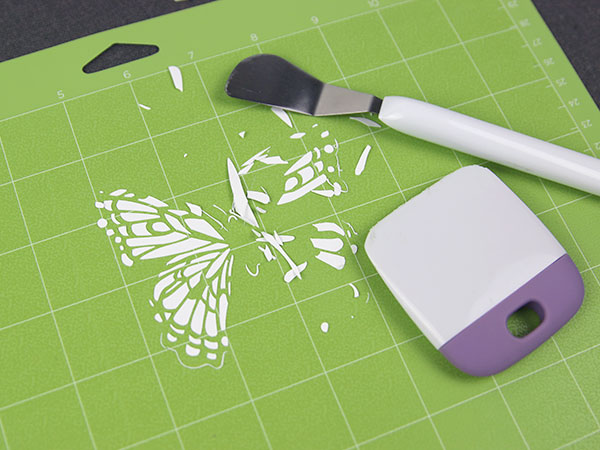
After the design has been removed, there will likely be paper still stuck on the mat. If there are any big pieces remaining that you would like to reuse in the future, flip the mat over and remove them using the same process as was used for the design. If there are small pieces remaining that are going to be recycled or thrown away, simply pick or scrape them off using tools or your fingers.
If your project has multiple pieces, continue to follow your machine’s software until you have every piece of your design cut out and ready to be assembled.
If problems occur, please reference our trouble shooting guide at the end of this article.
Craft Genesis products all come with assembly instructions. Depending on the complexity of the design and materials needed, some products will have step-by-step photos (with no text) that can be found on the design’s individual product page. For more complex designs, PDF project instructions (with photos and text) are included with your purchased download.
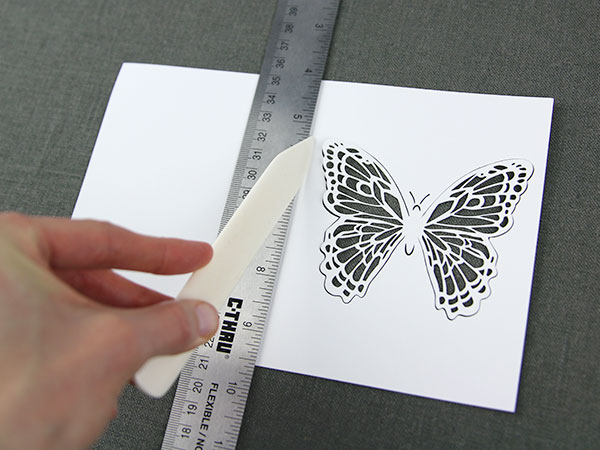
For projects with folds and scoring lines, a folding tool (also called a bone folder) is an excellent tool to add to your crafting set. It allows you to create beautiful and strong folds with ease. These can be found both online and in craft stores, and they are typically made of either cow bone or plastic. We recommend folding tools shaped like this. The straight edge and point together make it a very versatile tool that is easy to use.
If your bone folder has a point, it can also be used to score your paper before folding. This is extremely helpful if your machine does not have a scoring tool, since scoring lines make folding much easier.
To create a scoring line with a bone folder, take a ruler and line up one long edge with where you want the scoring line to be. Hold the ruler firmly in place with one hand and press the point of the folding tool into the paper as you drag it downward along the edge of the ruler. Make the scoring line as long or as short as needed and repeat the process anywhere you need to create a fold.
We highly recommend using scoring lines and a folding tool. Using these additional tools will make assembling your project easier, will create cleaner, stronger folds, and will take pressure off your hands and fingers – leaving you more time for future projects!
To fold along a scoring line, gently create the initial fold with your hands. If the paper is scored, it should fold exactly where you want very easily. After the fold is started, take your folding tool and press the edges along the fold with medium light pressure. Run over the fold a few times for best results.

When assembling a papercutting project, the two best adhesive options are liquid white glue and permanent double-sided tape. Both are easily found online and in craft stores. They also create a better hold when compared to other options like glue sticks or glue dots.
Liquid white glue is stronger and more permanent than tape, but you must be careful not to make the paper too wet with glue or it can warp and wrinkle. This type of adhesive works especially well for 3D projects and attaching pieces near a fold or corner that will be holding a lot of tension. One of our favorite types of glue for papercutting projects is Elmer’s Glue-All.
When using liquid glue, do not place it directly onto your paper. We recommend using a small plate or lid and a tool to spread the glue onto your paper, giving you more control over how much is being used. Popsicle sticks, a paint brush, or even your fingers work well for this, so long as the glue is water-soluble, non-toxic, and easily removed through washing.
When placing the glue on your paper, spread it in small thin patches rather than coating the hole area. Making small dots or lines around the outer and inner edges of the paper piece works great. After the glue is applied, simply hold the two paper pieces together until the glue completely dries.
Double-sided tape, on the other hand, works well on thinner paper that cannot hold as much moisture. Tape is also faster and cleaner to use. When selecting double-side tape for your projects, make sure it is “permanent” double-sided tape. Different brands have a stronger hold than others. Elmer’s Craft Bond Double Sided Tape and Angel Craft’s Double-Sided Tape are by far the strongest and most secure double-sided tape you can buy. Use caution when working with 3D projects or when taping along a corner or fold. Tape can fall apart over time or not hold at all at certain tension points.
Now you are ready to follow the assembly steps and finish creating your papercutting project!
Paper is wonderful medium for creating an amazing variety of gifts, décor, and keepsakes. With this guide, your creativity, a few SVG designs, and your cutting machine, there is no limit to the beautiful creations you can discover when working with paper. Check out some of our favorite designs and projects for papercutting, and get inspired to make them all your own!
Tips & Troubleshooting
If you are experiencing shifting with a detailed design:
- Try a stronger grip mat.
- Try a new mat.
- Try a new blade.
If the design is ripping while being removed from the mat:
- Try a lighter grip mat.
- If the design can be sized, make the design bigger.
If the blade is not cutting all the way through the paper:
- For heavier paper, run the same cut a second time without ejecting the mat.
- Take the cutting tool off of the machine and check for materials or debris trapped around the blade.
- Try a new blade.
- Add more pressure to the current setting if possible and try cutting the design again on new paper.
If the paper is shredding while cutting:
- Try a new blade.
- Try a new mat.
If neither of the above have helped:
- Tape the edges of your paper down using masking or painter's tape.
- Try a new setting that applies different pressure or speed.
- Make sure the grips on the roller bar are evenly spaced out.
- If the design can be sized, make the design bigger (the design may be too delicate).


